Home Assistant
This guide describes the installation of evcc as a Home Assistant addon. Unlike the Linux installation or Docker installation, you don’t need command line knowledge here.
Prerequisites
Section titled “Prerequisites”You need a Home Assistant installation with the Addon Store enabled. Depending on your installation type, this feature might not be available. See Home Assistant Documentation for more information.
Installation
Section titled “Installation”The current stable version.
- Automatically add repository: Click on the following button and then on Open link, then on Add.

- Manually add repository:
- Click on Settings → Addons → Add-on Store
- Click on the three dots → Repositories
- Add the repository URL and click Add
https://github.com/evcc-io/hassio-addon
- Reload the webpage
- Find the evcc addon and click on it
- Click on the INSTALL button
The current developer version. Updated daily. May be unstable.
Although it can be installed alongside the release version, only one version can run at a time.
If you use the nightly version, the paths and Docker container names mentioned in this guide will change, i.e., instead of evcc, you must use evcc-nightly.
- Automatically add repository: Click on the following button and then on Open link, then on Add.
- Manually add repository:
- Click on Settings → Addons → Add-on Store
- Click on the three dots → Repositories
- Add the repository URL and click Add
https://github.com/evcc-io/hassio-addon
- Reload the webpage
- Find the evcc (nightly) addon and click on it
- Click on the INSTALL button
Configuration
Section titled “Configuration”evcc can be configured in two ways:
Web Interface (recommended)
Section titled “Web Interface (recommended)”Go to the Information tab in the evcc addon and activate Show in sidebar (evcc UI http://your-ha-instance-ip-address:7070)
Go to the Configuration tab and select your working directory (example):
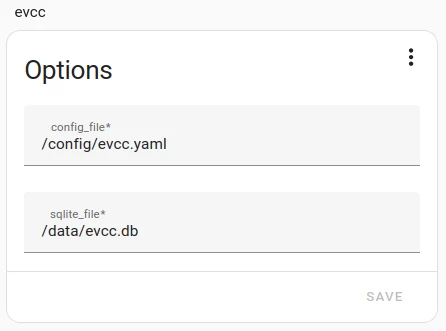
- sqlite_file: /data/evcc.dbLeave the Network section unchanged.
Start the addon. Then open the evcc interface via the sidebar:
- You’ll be prompted to set an administrator password
- You can then configure your devices directly via the web interface
- Settings are automatically saved in the database
Configuration File (traditional)
Section titled “Configuration File (traditional)”Alternatively, you can use an evcc.yaml configuration file.
Go to the Configuration tab and add the configuration file to your working directory:
- config_file: /config/evcc.yaml- sqlite_file: /data/evcc.dbCreate an evcc configuration file evcc.yaml in your addon root configuration folder (/addon_configs/49686a9f_evcc).
If this folder does not exist, create it manually.
To create or edit the configuration file, you have several options:
- Visual Studio Code: Select the hamburger menu in the top left and choose “File”, “Open Folder…”, select
/addon_configs/49686a9f_evcc - File Editor: Make sure you have disabled the “Enforce Basepath” option in the addon configuration, restart the addon and navigate to
/addon_configs/49686a9f_evcc - Advanced SSH & Web Terminal: Navigate to
/addon_configs/49686a9f_evccand use e.g. nano
See Configuration for details on creating the configuration file.
If you want to see the system running in demo mode, just start evcc with the parameter --demo.
See CLI Reference for more information.
Updates
Section titled “Updates”The update to the latest version of evcc is integrated into the Home Assistant update process.
Advanced Tips
Section titled “Advanced Tips”To perform the following functions, you need SSH access to Home Assistant. You can get this, for example, with the above-mentioned SSH Addon.
- Install Advanced SSH & Web Terminal
- Disable the “secure mode” in the Addon configuration
- Restart the Addon
- Open the Addon user interface
How do I access the evcc database?
Section titled “How do I access the evcc database?”Show the files in /data:
docker exec addon_49686a9f_evcc ls -la /dataCopy the evcc.db to /addon_configs/49686a9f_evcc:
docker cp addon_49686a9f_evcc:/data/evcc.db /addon_configs/49686a9f_evcc/How can I use the evcc CLI?
Section titled “How can I use the evcc CLI?”Open a shell to the evcc Docker container:
docker exec -it addon_49686a9f_evcc /bin/shRun evcc CLI commands (here as an example checkconfig):
evcc -c /config/evcc.yaml checkconfigClose the shell in the evcc Docker container if you are done:
exitHow can I use my external adapter / HAT in the Home Assistant evcc addon (Home Assistant OS, Raspberry Pi)?
Section titled “How can I use my external adapter / HAT in the Home Assistant evcc addon (Home Assistant OS, Raspberry Pi)?”If your Home Assistant device is close to your meter (solar, battery, grid, …) you can also retrieve the data directly via Modbus (e.g. USB).
To do this, you need to enable external devices for Home Assistant, which also includes the evcc addon.
To do this, uncomment the line uart = 1 in the config.txt file on the Home Assistant OS boot partition.
uart = 1After a restart, your device should be available to the evcc addon (probably as /dev/ttyS0 or /dev/ttyUSB)
Next Step: Integration
Section titled “Next Step: Integration”Once your system is running, you can set up the integration between evcc and Home Assistant. Under Integrations → Home Assistant you’ll find more information. You can visualize evcc data in Home Assistant or create automations based on evcc.